

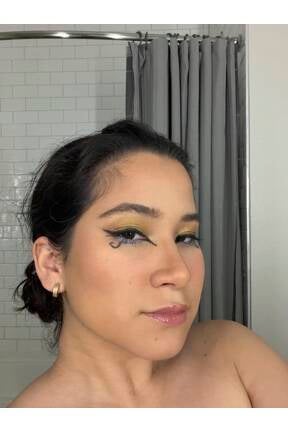
Highlighting Shadowing & Old Age 70s & 80s
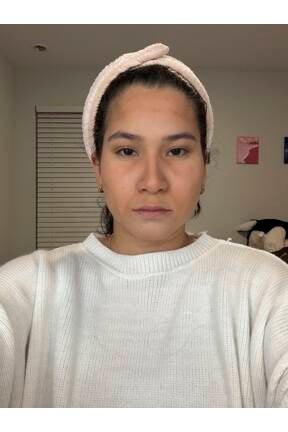
Personal makeup kit (contour palette, loose powder, blending brushes), no Ben Nye products yet. I started with a clean and moisturized face. First, I applied highlighting and shadowing to define my facial structure, focusing on cheekbones, nose, and jawline. My first attempt was overblended, so I corrected it by blending more carefully to create better contrast between light and shadow.
For the old age makeup, I used my natural facial expressions to place wrinkles. The 70s look was more subtle with softer lines, while the 80s look had deeper wrinkles and darker shading for a stronger effect. This application helped me understand facial structure, aging, and control in blending.


Corrective Makeup with Texture & Color Experiment
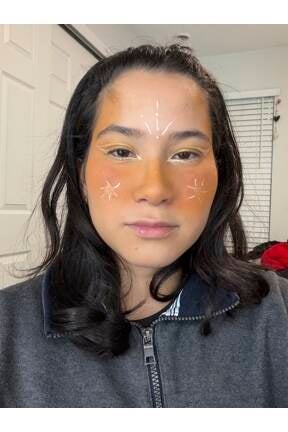
Personal makeup kit (cream products, orange tones, white liner), blending brushes, stipple sponge, and pantyhose for texture. I started with a clean, prepped face and applied corrective makeup to even out my skin tone and reduce redness, keeping the base natural for stage or camera lighting.
After that, I added warm orange tones to the cheeks and face to explore color placement. To create texture, I used a stocking over my skin and applied makeup on top to achieve a soft patterned effect. I adjusted pressure and product amount to avoid harsh lines.
Finally, I added simple white graphic details to create contrast and make the design more interesting. This application helped me understand corrective makeup, texture creation, and blending control.


17th & 18th Century Makeup
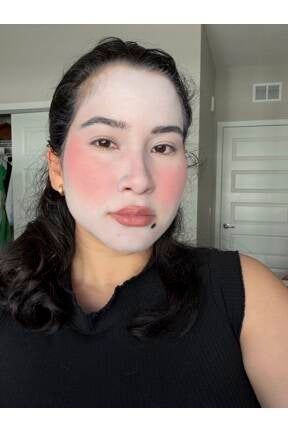
Personal makeup kit (white foundation base, blush, lip color, setting powder), makeup sponges, blending brushes, and pencil/liner for details. I started by creating a pale complexion for the 17th-century look using a white base, blending carefully to avoid harsh lines around the jawline.
I added soft rosy blush and natural lips, but I had to adjust the blush because it looked uneven at first. I corrected it by blending more and setting it with powder. For the 18th-century look, I used stronger blush, deeper lip color, and added a beauty patch to create a more dramatic and exaggerated effect.
This application helped me understand historical makeup differences, balance in blush placement, and attention to detail in design.
Greek Goddess Makeup – Aphrodite
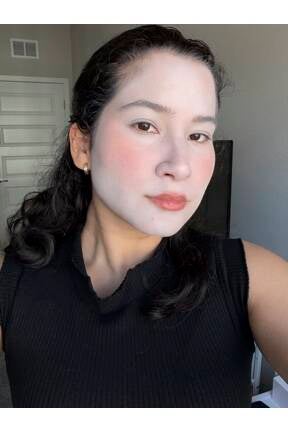
Personal makeup kit (foundation, concealer, blush, highlighter, pink eyeshadow, lip gloss, setting powder), blending sponge, foundation brush, and eyeshadow brushes. I started with corrective makeup to even out my skin tone and create a smooth base.
Then I created a soft, glowing look using warm blush, subtle contour, and highlighter to give my face a radiant effect. For the eyes, I applied pink-toned eyeshadow with a light shimmer and finished with mascara to enhance my lashes. I also used a glossy lip to complete the romantic style inspired by Aphrodite.
I styled my hair with loose curls to match the elegant and feminine look. I made small adjustments to the blush and eye makeup to improve balance. This application helped me understand beauty makeup for stage and character creation.

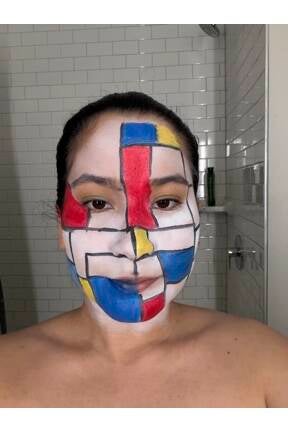
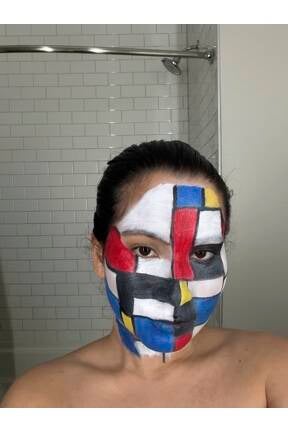
Mondrian-Inspired Makeup
Personal makeup kit (white cream base, black cream, red, yellow, and blue pigments), detail brushes, and blending tools. I started by planning the placement of vertical and horizontal lines to create a balanced and structured design across my face and neck.
I applied a white base to cover the skin evenly, then used black cream to create the grid lines. The most challenging part was making straight, clean lines on a curved surface, so I had to go over them multiple times to sharpen the edges. After that, I filled selected sections with primary colors (red, yellow, and blue) to complete the design.
This application required patience and precision. It helped me improve brush control and understand the importance of planning in geometric stage makeup.
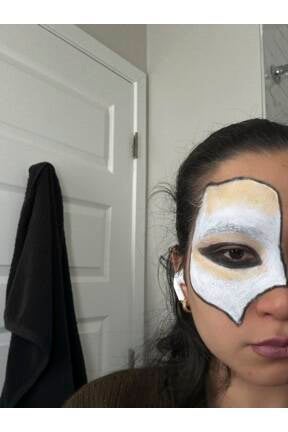
Masquerade Ball – Phantom of the Opera
Personal makeup kit (white cream product, gold tones, dark eyeshadows, eyeliner, setting powder), blending brushes, and detail brushes. I started by creating a dramatic eye makeup look, focusing on strong blending, depth, and contrast so the eyes would be visible under stage lighting.
For the masquerade design, I chose a half-mask inspired by Phantom of the Opera. I sketched the shape with eyeliner, filled it with a white base, and added contour and gold tones to create dimension and avoid a flat appearance. One challenge was achieving smooth coverage with the white and keeping the mask symmetrical, so I adjusted the outline and shading multiple times.
This application helped me understand exaggeration, contrast, and precision in theatrical makeup.

Egyptian Makeup – Cleopatra
Personal makeup kit (gold eyeshadow, black eyeliner, setting powder), eyeshadow brushes, and detail brushes. I started by creating a smooth base and then focused on the eyes, using gold tones to represent royalty and wealth, which were important in Ancient Egyptian culture.
I used black eyeliner to create a dramatic almond-shaped eye inspired by traditional kohl makeup. I extended the eyeliner outward to achieve a bold and theatrical look suitable for stage. I also added small decorative lines under the eyes to enhance the design and make it more visually interesting.
This application helped me understand historical influence in makeup and how to exaggerate features for stage performance. I was successful on the first attempt and enjoyed recreating this iconic style.

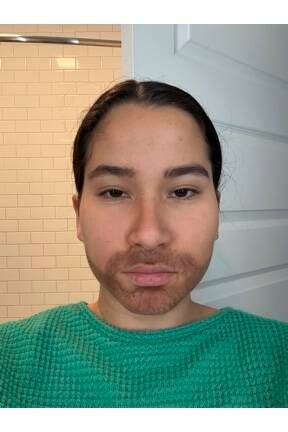
Male Makeup
Personal makeup kit (dark cream/powder for beard effect, setting powder), stipple sponge, and blending tools. I started by pulling my hair back to create a more masculine appearance and focused on building texture around the mustache, chin, and jawline.
Using a stipple sponge, I applied the product with light tapping motions to simulate a five o’clock shadow. My first attempt looked too dark and unnatural, so I removed some product and blended more to soften the effect. Adjusting the pressure and layering helped create a more realistic stubble instead of solid color.
This application helped me understand the importance of texture, layering, and blending in stage makeup to achieve natural-looking facial hair.
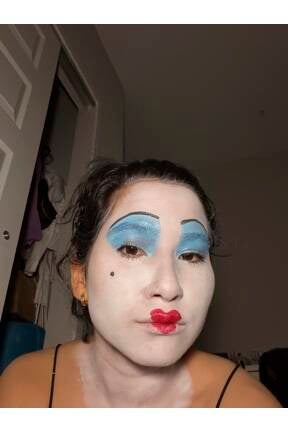
Pop Art Makeup
Personal makeup kit (black liner, red lip color, white product for dots, setting powder), detail brushes, and blending tools. I started by defining my facial features using bold black lines around the eyes, eyebrows, nose, and lips to create a graphic, comic-style effect.
I added white dots using the end of a brush to imitate the Ben-Day dots style, which is common in Pop Art. I also created bright red lips with highlights to give a dramatic and expressive look inspired by comic illustrations. My goal was to make the face look more like a drawing than real skin.
This application helped me understand exaggeration, contrast, and how makeup can transform a face into a character using artistic techniques.


Nature-Inspired Makeup (Plants & Leaves)
Personal makeup kit (green tones, gold details, setting powder), detail brushes, and blending brushes. I started by designing branches and leaves across my face using different shades of green to create a nature-inspired look.
I used thin and thicker brushes to build variation in the lines and give the design more movement. At first, it was difficult to make the lines smooth, so I practiced and adjusted the shapes to improve the overall result. I added small gold details to make the design more visually interesting and to highlight certain areas.
This application helped me improve brush control and creativity. If I continue developing this look, I would add more depth and extend the design to the neck.


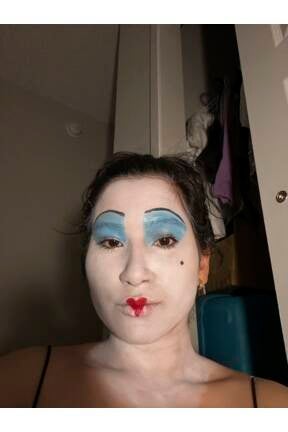
Fantasy Makeup – Queen of Hearts
Personal makeup kit (white base, blue eyeshadow, red lip color, eyeliner, setting powder), blending brushes, and detail brushes. I started by applying a white base to create a theatrical and royal appearance inspired by the Queen of Hearts from Alice in Wonderland.
I added bold blue eyeshadow and exaggerated eyebrows to enhance her dramatic and powerful expression. I also created small red heart-shaped lips to represent her iconic design. One challenge was achieving symmetry in the eyes, so I adjusted the shape until both sides matched.
This application helped me understand character creation, exaggeration, and expression in fantasy stage makeup. I am happy with the final result because it creates a strong and recognizable character.
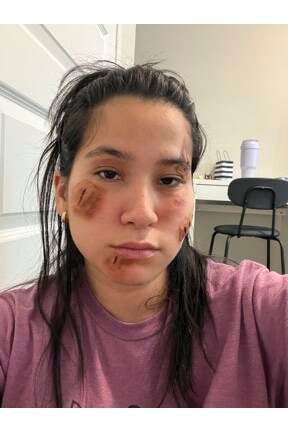
Trauma Makeup – Cuts & Bruises
Personal makeup kit (bruise wheel with red, purple, and yellow tones, dark cream for depth, stage blood), stipple sponge, and blending tools. I created a series of cuts and bruises to represent physical injury from an accident or fight.
I used a bruise wheel to build realistic skin discoloration by layering different colors to imitate swelling and damaged tissue. I applied the colors with a sponge to create an uneven and natural effect. For the wounds, I added a darker shade in the center for depth and applied fake blood to make the injuries appear fresh. I also allowed some blood to drip slightly to follow gravity for a more realistic look.
This application helped me understand layering, blending, and texture in creating believable trauma effects.

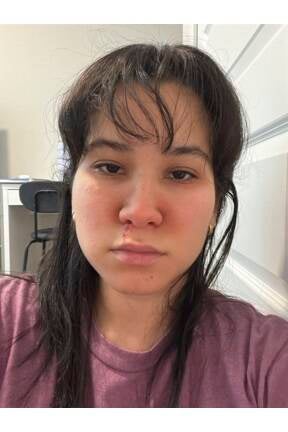
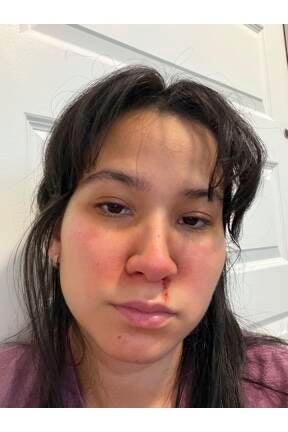
Contagion Makeup – Illness Effect
Personal makeup kit (red and purple tones, light cream products, stage blood, setting powder), stipple sponge, and blending tools. I created a makeup look inspired by a common illness, focusing on irritated, inflamed, and tired skin.
I applied red tones around the nose and cheeks to represent fever and sensitivity. Under the eyes, I used soft purple tones to create dark circles and show fatigue. I also added a small amount of fake blood under the nose to represent irritation from dryness. I blended all the colors with a sponge to keep the look natural and avoid harsh lines.
One challenge was controlling the intensity of the colors so it looked like illness instead of bruising. This application helped me understand subtle color placement and realism in contagion effects.
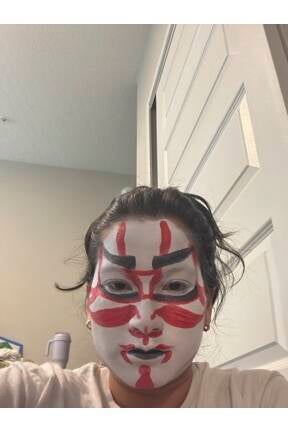
Kabuki Makeup – Kumadori (Red Hero Design)
Personal makeup kit (white base, red and black cream/liner, setting powder), detail brushes, and blending tools. I created a Kabuki-inspired makeup look based on the Kumadori style, choosing the red design to represent a heroic character.
I applied a white base to reflect the traditional Kabuki appearance, then added bold red lines following the natural muscles of the face to show strength, courage, and justice. I also used black to define the eyes and eyebrows, creating a more intense and theatrical expression. The placement of the lines was important to communicate the character clearly from a distance.
This application helped me understand how Kabuki makeup uses color and design to express emotion and personality. It also connected to my research on how visual elements can tell a story without words.

Create Your Own Website With Webador